

How To Install Shiny In Rstudio
Your first Shiny app
Introduction
In this chapter, we'll create a simple Shiny app. I'll start by showing y'all the minimum boilerplate needed for a Shiny app, so yous'll learn how to start and terminate it. Next you'll acquire the two key components of every Shiny app: the UI (short for user interface) which defines how your app looks, and the server office which defines how your app works. Shiny uses reactive programming to automatically update outputs when inputs alter and so we'll stop off the chapter past learning the 3rd important component of Shiny apps: reactive expressions.
If yous haven't already installed Shiny, install it at present with:
If you've already installed Shiny, use packageVersion("shiny") to check that y'all have version ane.5.0 or greater.
Then load in your electric current R session:
Create app directory and file
There are several ways to create a Shiny app. The simplest is to create a new directory for your app, and put a unmarried file chosen app.R in it. This app.R file volition be used to tell Shiny both how your app should look, and how information technology should behave.
Try it out past creating a new directory, and adding an app.R file that looks like this:
This is a complete, if trivial, Shiny app! Looking closely at the code above, our app.R does four things:
-
Information technology calls
library(shiny)to load the shiny bundle. -
It defines the user interface, the HTML webpage that humans interact with. In this instance, it's a page containing the words "Hello, world!".
-
It specifies the behaviour of our app by defining a
serverfunction. Information technology's currently empty, so our app doesn't practise anything, simply we'll be back to revisit this shortly. -
It executes
shinyApp(ui, server)to construct and get-go a Shiny awarding from UI and server.
RStudio Tip: There are two user-friendly ways to create a new app in RStudio:
-
Create a new directory and an
app.Rfile containing a bones app in one footstep past clicking File | New Project, so selecting New Directory and Shiny Web Application. -
If you've already created the
app.Rfile, you lot tin can quickly add together the app boilerplate by typing "shinyapp" and pressing Shift+Tab.
Running and stopping
In that location are a few ways you tin run this app:
-
Click the Run App (Effigy ane.ane) button in the document toolbar.
-
Use a keyboard shortcut:
Cmd/Ctrl+Shift+Enter. -
If yous're non using RStudio, you tin
(source())i the whole document, or telephone callshiny::runApp()with the path to the directory containingapp.R.

Effigy 1.1: The Run App button can be constitute at the top-right of the source pane.
Pick i of these options, and check that yous run across the aforementioned app as in Figure i.two. Congratulations! You've made your first Shiny app.
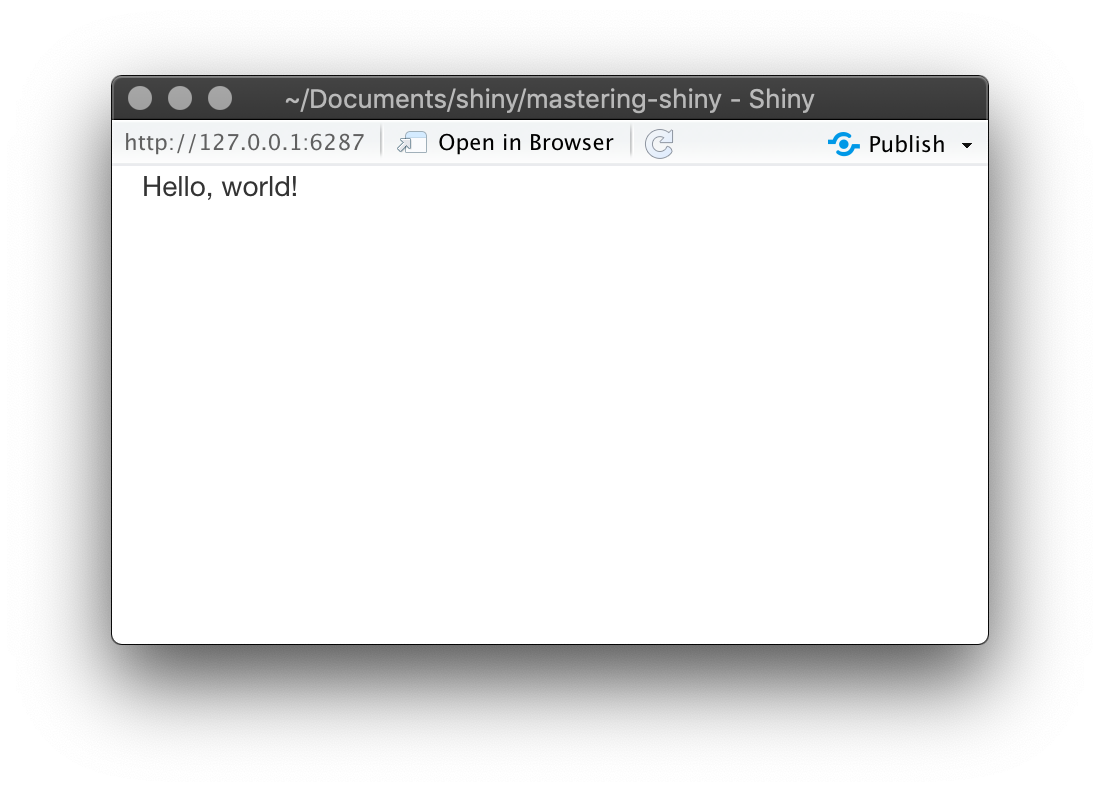
Figure ane.2: The very basic shiny app you'll see when you lot run the code above
Before you close the app, go back to RStudio and wait at the R panel. You'll detect that it says something like:
#> Listening on http://127.0.0.ane:3827 This tells yous the URL where your app tin be found: 127.0.0.one is a standard address that means "this computer" and 3827 is a randomly assigned port number. You can enter that URL into any compatible2 web browser to open another copy of your app.
Also notice that R is decorated: the R prompt isn't visible, and the console toolbar displays a terminate sign icon. While a Shiny app is running, information technology "blocks" the R console. This means that y'all can't run new commands at the R console until the Shiny app stops.
You can stop the app and return access to the panel using any i of these options:
-
Click the stop sign icon on the R console toolbar.
-
Click on the panel, so printing
Esc(or printingCtrl+Cif yous're non using RStudio). -
Close the Shiny app window.
The bones workflow of Shiny app development is to write some lawmaking, start the app, play with the app, write some more code, and echo. If you lot're using RStudio, you don't even need to stop and re-outset the app to see your changes — yous tin either press the Reload app button in the toolbox or utilise the Cmd/Ctrl + Shift + Enter keyboard shortcut. I'll comprehend other workflow patterns in Chapter 5.
Calculation UI controls
Next, we'll add some inputs and outputs to our UI so it's not quite so minimal. We're going to make a very uncomplicated app that shows you all the built-in data frames included in the datasets bundle.
Replace your ui with this code:
This example uses four new functions:
-
fluidPage()is a layout function that sets up the basic visual construction of the folio. You lot'll learn more than about them in Section 6.two. -
selectInput()is an input control that lets the user collaborate with the app by providing a value. In this case, it's a select box with the label "Dataset" and lets you choose one of the built-in datasets that come with R. You'll learn more about inputs in Section 2.ii. -
verbatimTextOutput()andtableOutput()are output controls that tell Shiny where to put rendered output (nosotros'll become into the how in a moment).verbatimTextOutput()displays code andtableOutput()displays tables. You'll larn more most outputs in Section two.3.
Layout functions, inputs, and outputs have different uses, only they are fundamentally the same nether the covers: they're all only fancy ways to generate HTML, and if you call any of them outside of a Shiny app, y'all'll meet HTML printed out at the panel. Don't be afraid to poke around to run into how these various layouts and controls piece of work under the hood.
Go ahead and run the app again. You'll at present encounter Effigy ane.3, a page containing a select box. We only see the input, not the two outputs, considering we haven't however told Shiny how the input and outputs are related.

Figure 1.3: The datasets app with UI
Adding behaviour
Next, nosotros'll bring the outputs to life by defining them in the server function.
Shiny uses reactive programming to make apps interactive. You'll acquire more most reactive programming in Affiliate 3, but for now, just exist enlightened that it involves telling Shiny how to perform a computation, not ordering Shiny to actually become practice it. It's similar the divergence between giving someone a recipe versus enervating that they get brand you a sandwich.
We'll tell Shiny how to make full in the summary and tabular array outputs in the sample app by providing the "recipes" for those outputs. Replace your empty server function with this:
server <- function ( input, output, session ) { output $ summary <- renderPrint ( { dataset <- go ( input $ dataset, "package:datasets" ) summary ( dataset ) } ) output $ table <- renderTable ( { dataset <- get ( input $ dataset, "parcel:datasets" ) dataset } ) } The left-hand side of the assignment operator (<-), output$ID, indicates that you're providing the recipe for the Shiny output with that ID. The correct-hand side of the consignment uses a specific render function to wrap some code that y'all provide. Each return{Type} office is designed to produce a particular type of output (e.g. text, tables, and plots), and is often paired with a {type}Output part. For example, in this app, renderPrint() is paired with verbatimTextOutput() to brandish a statistical summary with stock-still-width (verbatim) text, and renderTable() is paired with tableOutput() to show the input data in a table.
Run the app once again and play around, watching what happens to the output when you change an input. Figure 1.4 shows what yous should see when you open the app.
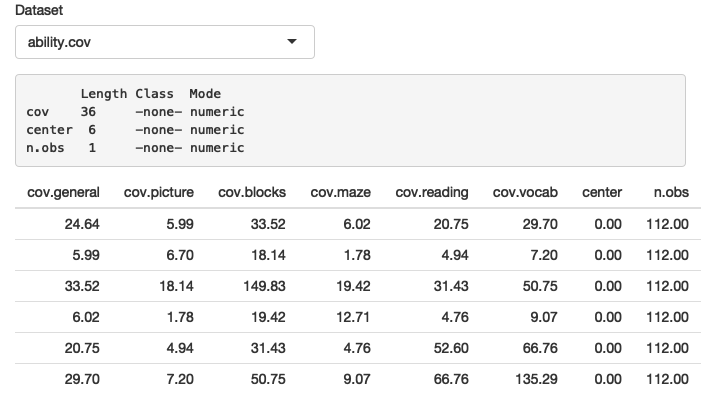
Figure 1.4: At present that we've provided a server function that connects outputs and inputs, nosotros have a fully functional app
Discover that the summary and table update whenever you change the input dataset. This dependency is created implicitly because nosotros've referred to input$dataset within the output functions. input$dataset is populated with the current value of the UI component with id dataset, and will cause the outputs to automatically update whenever that value changes. This is the essence of reactivity: outputs automatically react (recalculate) when their inputs change.
Reducing duplication with reactive expressions
Even in this elementary example, nosotros have some lawmaking that's duplicated: the post-obit line is nowadays in both outputs.
dataset <- get ( input $ dataset, "parcel:datasets" ) In every kind of programming, it's poor practice to have duplicated code; it can exist computationally wasteful, and more importantly, it increases the difficulty of maintaining or debugging the code. It'southward non that important here, but I wanted to illustrate the basic idea in a very simple context.
In traditional R scripting, we use ii techniques to bargain with duplicated lawmaking: either we capture the value using a variable, or capture the computation with a office. Unfortunately neither of these approaches work here, for reasons you lot'll learn almost in Department 13.two, and we need a new mechanism: reactive expressions.
You lot create a reactive expression by wrapping a block of code in reactive({...}) and assigning it to a variable, and you utilise a reactive expression by calling information technology similar a function. Only while it looks like you're calling a function, a reactive expression has an important deviation: it merely runs the beginning fourth dimension it is called and and then it caches its consequence until it needs to be updated.
Nosotros tin can update our server() to use reactive expressions, as shown below. The app behaves identically, just works a little more efficiently considering it only needs to think the dataset in one case, not twice.
server <- part ( input, output, session ) { # Create a reactive expression dataset <- reactive ( { go ( input $ dataset, "package:datasets" ) } ) output $ summary <- renderPrint ( { # Employ a reactive expression by calling it like a function summary ( dataset ( ) ) } ) output $ table <- renderTable ( { dataset ( ) } ) } We'll come back to reactive programming multiple times, but even armed with a cursory knowledge of inputs, outputs, and reactive expressions, it's possible to build quite useful Shiny apps!
Summary
In this affiliate you've created a unproblematic app — it's non very exciting or useful, but seen how easy it is to construct a web app using your existing R cognition. In the next two chapters, yous'll learn more virtually user interfaces and reactive programming, the two basic building blocks of Shiny. Now is a dandy time to grab a copy of the Shiny cheatsheet. This is a great resource to help jog your retention of the main components of a Shiny app.
Exercises
-
Create an app that greets the user by name. You lot don't know all the functions you need to do this all the same, so I've included some lines of code below. Think virtually which lines y'all'll use and and so copy and paste them into the correct identify in a Shiny app.
-
Suppose your friend wants to pattern an app that allows the user to set a number (
ten) betwixt 1 and 50, and displays the issue of multiplying this number by 5. This is their first attempt:But unfortunately information technology has an fault:
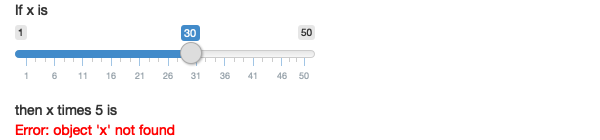
Can you lot help them find and correct the error?
-
Extend the app from the previous exercise to allow the user to set the value of the multiplier,
y, so that the app yields the value ofx * y. The final result should look like this:.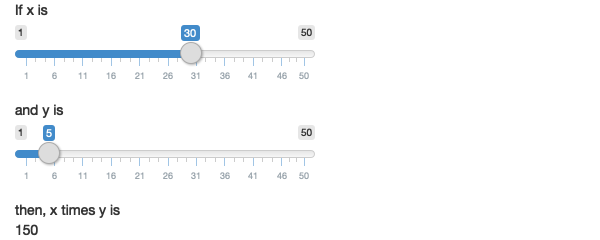
-
Take the following app which adds some additional functionality to the last app described in the last exercise. What's new? How could you reduce the corporeality of duplicated code in the app by using a reactive expression.
library ( shiny ) ui <- fluidPage ( sliderInput ( "ten", "If x is", min = i, max = fifty, value = 30 ), sliderInput ( "y", "and y is", min = 1, max = 50, value = v ), "and so, (10 * y) is", textOutput ( "production" ), "and, (ten * y) + 5 is", textOutput ( "product_plus5" ), "and (x * y) + 10 is", textOutput ( "product_plus10" ) ) server <- office ( input, output, session ) { output $ product <- renderText ( { product <- input $ x * input $ y product } ) output $ product_plus5 <- renderText ( { product <- input $ 10 * input $ y product + 5 } ) output $ product_plus10 <- renderText ( { production <- input $ x * input $ y product + 10 } ) } shinyApp ( ui, server ) -
The following app is very similar to one you've seen earlier in the chapter: you select a dataset from a package (this time we're using the ggplot2 parcel) and the app prints out a summary and plot of the data. It too follows good exercise and makes utilise of reactive expressions to avert redundancy of code. However there are three bugs in the lawmaking provided below. Can you find and ready them?
library ( shiny ) library ( ggplot2 ) datasets <- c ( "economics", "faithfuld", "seals" ) ui <- fluidPage ( selectInput ( "dataset", "Dataset", choices = datasets ), verbatimTextOutput ( "summary" ), tableOutput ( "plot" ) ) server <- function ( input, output, session ) { dataset <- reactive ( { get ( input $ dataset, "bundle:ggplot2" ) } ) output $ summmry <- renderPrint ( { summary ( dataset ( ) ) } ) output $ plot <- renderPlot ( { plot ( dataset ) }, res = 96 ) } shinyApp ( ui, server )

Source: https://mastering-shiny.org/basic-app.html
Posted by: johnsonandoulte.blogspot.com
0 Response to "How To Install Shiny In Rstudio"
Post a Comment